Recipes
These are the cooking recipes.
BBQ Ribs in the Instant Pot


I love to make ribs. Love them juicy, tender, and full of flavor. But I do not have the time to make them in a grill, smoker, or even the oven for hours. Instant Pot makes it easier for me to make fall off the bone ribs without having to cook for so many hours. You cook them in the pressure cooker and finish them in the grill or oven for that caramelized BBQ sauce flavor that enhances the ribs. It is a really easy and quick way to make ribs.
The good thing about making a full rack is, they are easy to keep juicy and tender. When preparing the rack for cooking, I trim the excess fat. Some fat is good for your ribs, but too much of it makes a mess when cooking and doesn’t add to the flavor of your ribs. I also remove the membrane behind the rack. That membrane makes the ribs harder, not as tender as they could be. It is a little tricky but not impossible. Just make a little cut on the membrane and with a paper towel, pull the membrane off the rack. You might not be able to remove it all and that will be ok. You ribs are still going to be delicious!

Seasoning – when seasoning the rack, I tend to be more cautious about the amount of salt. A full rack could easily use 2 tbsp of salt.
Liquid for cooking – for cooking anything in the Instapot, you need liquid. It is what is going to create the steam that will pressurize the pot to cook your ribs. I like beers and ales for pork, they work with the seasonings to enhance the flavor of your ribs. But if you choose not to use beer, you can replace it with apple cider vinegar, apple cider, orange juice, or just water.

Instant Pot – when cooking the ribs, make sure it is on High. You can cook the ribs for 16-25 minutes in High pressure. In the lower ranges, the meat is not going to be as tender. In the highest range, the bones might fall off the rack. I have found 21 minutes to be perfect.
Trivet Rack – you definitely want to use the rack. You want the meat about the liquid so the flavors stay in your meat, not in the liquid.
Natural Release – after you finish cooking the ribs, you want to let them rest in the Instant Pot for 15 minutes. If you quick release them, they might not be as tender. Leaving them to rest, will assure they will finish cooking and the juices are staying in your meat instead of your pot or plate.


BBQ Sauce – you can use your own BBQ sauce or you can use this awesome Easy Asian BBQ Sauce I made, it is a nice balance of sweet and heat that works perfectly with the ribs. I like my ribs with a thinner layer of sauce. If you like them saucy, 1 cup of BBQ sauce should do. You could also serve the ribs with extra warm BBQ sauce to dip.
Grill vs Oven – I have done the ribs on both, and on both, they are delicious! Sometimes the decision is more about convenience. If I have time and is not raining, I will grill the ribs in my gas grill. But if it’s raining, or too hot, or I am really busy, the oven does a great job. All you need to do is caramelize the BBQ sauce on your ribs.

BBQ Ribs Using Instant Pot
This is a very easy recipe to make juicy and tender ribs quick using an Instant Pot Pressure Cooker. It cuts the time in the grill or the oven, keeping the delicious flavor and so tender, they fall off the bone.
Ingredients
- 4 lbs pork ribs full rack
- 1 tbsp Salt or to taste
- 1 tbsp black pepper
- 1 tbsp Garlic Powder
- 1 tbsp Oregano dried
- 12 oz beer
- 1/8 tsp liquid smoke
- 1 cup BBQ sauce
Instructions
-
Wash the ribs rack and pat dry with paper towels. Trim the thin membrane covering the rack and any excess fat.
-
Season the ribs with salt, pepper, garlic powder and oregano covering both sides of the rack.
-
Place the trivet inside of the Instant Pot. Pour the beer and liquid smoke into the Instant Pot.
-
Place the ribs rack standing with the bones down around the bowl inside the Instant Pot.
-
Close the Instant Pot lid, setting the venting knob to Sealing Position. Set the Instant Pot to cook on High, Manual setting for 21 minutes.
-
If baking the ribs, turn the oven to 450 F. If grilling, turn the grill to 350 F.
-
Once the cooking is done, leave the ribs inside the Instant Pot for the natural release of the pressure for 15 minutes. After the 15 minutes have passed, set the venting knob to Venting and lets the rest of the pressure release. Carefully open the lid.
-
Using the kitchen tongs, remove the rack from the Instant Pot and place the rack on the rimmed baking sheet.
-
Brush the BBQ sauce first on the bottom of the rack, flip and brush the top of the rack.
-
Place the ribs on the oven and bake for 15 minutes or until the BBQ sauce is caramelized. The same thing applies to the grill.
-
Cut the ribs into individual ribs and serve hot. Add additional BBQ sauce if desired.
Recipe Notes
Cooking time - ribs can cook in the Instant Pot between 16 - 25 minutes. The lower range is not going to be as tender, the higher range the bones might come off. I cooked them at 21 minutes and they come perfect.
Cooking liquid - You can use any kind of beer that you choose. I prefer apple hard ales because of the flavor it adds to the ribs. You could replace the beer with apple cider vinegar, apple cider, orange juice, or just water.
BBQ Sauce - you can use your preferred BBQ sauce, or you could use my recipe for Easy Asian BBQ Sauce. I prefer my ribs with a thinner layer of sauce, you are welcome to use more if you like them really wet.
Seasoning the rack - you can add more seasoning if you prefer, I tend to go easy on the salt, but a whole rack could easily use 2 tbsp of salt.
Easy Asian BBQ Sauce


Usually, when I am grilling or baking meats that require BBQ sauce, I use a store-bought sauce and give it a “boost”. Usually, they are too sweet for my taste, so I try to cut the sweetness, or they are not spicy enough, so I bring up the heat. Most times, I end up making my own barbecue sauce, just the way I like it!
This recipe is very easy and quick to make. It uses all store-bought ingredients, so there is only dumping in a bowl and mix. That easy! And it is so delicious, you can use it on ribs, chicken, wings, pork or even on vegetables. It is not very sweet, with a little spiciness to give it some kick!

- Sweetness – if the sauce is not sweet enough for you, add a 1/4 cup of brown sugar or honey.
- Heat – not hot enough, increase the chili garlic sauce to your taste.
- Smoke – this recipe has a hint of smoke added to your grill or bake. If you prefer a stronger smoke flavor, you can always double the liquid smoke. I would not use more than that or the other ingredients are going to be lost in the smokiness.
Easy Asian BBQ Sauce
This BBQ sauce uses some Asian ingredients with a mix of sweet and spicy that grills very nicely on your meats.
Ingredients
- 0.5 cup Ketchup
- 1 tsp Soy sauce
- 2 tbsp Hoisin sauce
- 2 tbsp Sweet chili sauce
- 1 tbsp ginger paste
- 1 tbsp Chili garlic sauce
- .5 tsp liquid smoke
Instructions
-
MIx all the ingredients in a small bowl until it is all blended. Refrigerate covered. Remove from the refrrigerator 30 minutes before use.
Recipe Notes
If you prefer your BBQ sauce spicier, increase the Chili garlic sauce.
If you like it sweeter, add a 1/4 cup of brown sugar or honey.
Mom’s Famous Breakfast Sandwich

My mom makes THE best breakfast sandwich (#mymomisthebestcook)!! Every Sunday after church we would stop at the “panaderia” (bakery) and get some freshly made Pan de Agua (Water bread). It similar to Cuban, French, or Italian bread, has the same ingredients but different ways to bake it. Then we would go home and she would fry some eggs, ham, and sweet plantains and she would make this bundle of deliciousness that would make any Sunday a real Glorious day! Every time we would have friends come over to visit my mom, she would make those for breakfast and they always go crazy over it.

If you don’t access to Water Bread (or Cuban, French, or Italian), you can use really any type of bread you want. The idea is for the bread to be warm but not hard. It is difficult to eat a sandwich when the bread is so hard. On the photo, I used Jewish rye (I LOVE Rye bread) and in the video, I used sourdough bread. But any type of slice bread will work.
You can use any type of cheese you want. Usually, we made it with Cheddar or Gouda, but any cheese that melts will work. You want to give it a kick, add some Pepperjack, Yummmm!!!!
When frying the eggs, the hardness of the yolks is going to be determined by how messy you want your sandwich. The softer the yolk, the messier is going to be, but to me, its more flavorful that way. Sometimes I put a pinch of salt and pepper when frying the eggs, but with the cheese and the ham, it is not really necessary. I don’t use a lot of oil when frying the eggs, most of the times just a thin coat of oil does the trick. I usually put the ham in the same pan I am frying the eggs because really all you want is to warm up the ham. A light browning does it.
You can replace the ham for bacon, prosciutto, salami, mortadella (yummm!!), or any other sliced meat you prefer. To me, ham is the winner!

When making the plantains, you can cheat a little. A lot of grocery stores have sweet plantains in the freezer section, partly cooked. All you have to do is open your container, and fried them in oil. If you want to go more traditional, get some ripe plantains from the produce, peel them, cut them in 1-inch (25 mm) diagonal slices. The more oil, the easier it will be to fry. I don’t like to have oil all over the stove, so I use a little oil and keep a close eye. You want them a pretty brown, not black. Brown means the sugars are caramelizing and they will be outstanding.
I hope you enjoy this sandwich as much as we do! Buen Provecho from my mom and me!!

Mom's Famous Breakfast Sandwich
My mom makes the most delicious breakfast sandwich you will ever have! At least it is to me! Its simple to make and I am sure you will want seconds!
Ingredients
- 2 eggs Fried
- 2 slices ham Fried
- 2 slices cheese Your choice
- 2 slices Bread Somewhat toasted but not too hard.
- 3 pieces Sweet Plantains Fried
- 1 pinch Salt Optional
- 1 pinch Pepper Optional
Instructions
-
Fried your sweet plantains and ham and keep warm.
-
Fried the eggs to the point of the yolk to be a little bit runny or completely cooked. You could sprinkle some salt and pepper to the egg while frying, it is optional. Ligthly toast the bread.
-
Assemble the sandwich, slice of bread, eggs, cheese, ham, sweet plantains and second slice of bread.
Recipe Notes
You could use any bread you prefer, my mom always made it with Water Bread, but you would use any type of bread you prefer.
Fried Chicken in the Air Fryer


Fried Chicken is the Best! No question about it! When I was growing up and learning to cook, fried chicken was one of the easiest and most delicious things I learned to make. We didn’t use flour to fry it, just season it and dump it on the hot oil. The skin came out crispy and with all the seasoning, the flavor was fantastic! For us, there was fried chicken and breaded chicken. Breading was an option, but not the norm.
Now here in the US, fried chicken is always breaded. Nothing wrong with that. I am a loyal fan of southern fried chicken!! I will never say no to good fried chicken. But when I make fried chicken at home, I always go back to my roots of chicken without the breading. And when I finally got my air fryer, is like the Sky open and the Angels came out singing the beautiful news of frying without oil!!

This is my Air Fryer. It is a Maxi Matic Elite Platinum 5.5 Qt Air Fryer, got it on sale for a Black Friday 2 years ago. That poor thing has been thru cooking hell and abuse. Some of the parts are broken, and you can tell it has been used, a lot. We use it at least 4 or 5 days a week. Somedays, it makes lunch and dinner! Next to the stove, it is second most used appliance in my kitchen. Ok, so probably do not compete with the microwave or the Keurig, but it is really close. We make so many things in that thing, sometimes I wonder how we survived without it. But I digress.
The best thing for me of this air fryer is the fact that I do not have to use tons of oil. Until the air fryer makes it appearance in my house, I fried very little. I just can’t stand oil everywhere on the stove and the smell of frying oil, not a pleasant thing after you ate your chicken, trust me. Not to mention that when you are frying, you are adding more fat to your meal. I have no problem with fat, God knows I have plenty of it. But try to cut whenever I can.

This recipe is one of the easiest recipes to make fried chicken you will ever find. You just take chicken pieces, dump a bunch of spices and herbs on them, cover them and throw them in the air fryer. That is it. As simple as that. The hardest part is actually cutting the chicken. I use chicken leg quarters because they are so flavorful and cheap! But you could very easy replace the legs and thighs with wings, chicken breast or even the whole chicken cut in pieces. The seasoning will also work for pork chops.
The hardest thing that is not available everywhere is the Sazon. Sazon is a seasoning used in Latin cuisine for seasoning and coloring. It is used in stewes, soups and rice. My mom always thought me to use it on chicken and pork. It adds to the flavor of your meat and gives it a nice color, especially if you are frying or roasting the meat. But if you are not able to find Sazon at your grocery store, you can replace it with annatto, smoked paprika or even turmeric. You can read more about annatto on my of my posts, it is a very interesting seasoning. If you don’t have garlic paste available, replace it with 1 tablespoon of garlic powder. If you use garlic salt, then reduce the amount of salt used in the recipe.
Fried Chicken on the Air Fryer
This is a super easy recipe on how to make fried chicken without flour and very little oil, but still packing a punch of flavor!
Ingredients
- 1 tsp sea salt
- 1 tsp black pepper
- 1.5 tbsp garlic paste
- 1 tsp oregano
- 1/2 tsp coriander
- 1/2 tsp cumin
- 1/4 tsp sage
- 1/8 tsp cayenne pepper
- 1.5 tsp Sazon 1 packet
- 1 tbsp olive oil
- 2 lbs chicken leg quarters cutted, trimmed and clean
Instructions
-
Set your air fryer to 400° F (204° C) for 3 minutes to warm up the basket.
-
Place the chick legs and thighs in a large bowl. Throw all the other ingredients in the bowl with the chicken and mix until all the legs and things are evenly covered by the mix of spices and herbs.
-
LIghtly spray the basket with spray oil to prevent chicken from sticking.
-
Place the chicken pieces skin up, side by side in the basket. They can touch each other, just not on top of each other. Place basket in the air fryer and set it to 400° F (204° C) for 10 minutes.
-
Open the basket, flip the chicken pieces and put the basket back in the air fryer and cook at the same temperature for another 10 minutes.
-
Open the basket, flip the chicken pieces again and put the basket back in the air fryer, and cook at the same temperature for 5 mintes. Once done, let chicken set for a few minutes and enjoy!!
Recipe Notes
- I prefer to use legs and thighs, but you could very easily use wings or even a whole the whole chicken cut in pieces. Just be aware, the bigger the pieces, the longer it will take for the chicken to cook, so last cooking time, add 1 or 2 minutes extra.
- If Sazon is not available, you can replace it with 1 tsp of powder annatto, smoked paprika or even turmeric. The Sazon not only adds flavor to the chicken but also color. The annatto, paprika and turmeric will do the same.
Candied Papaya (Dulce de Lechosa)
")

Living in Florida, papayas are very available. Sometimes I have several papayas ready to harvest. That is a great opportunity to make candied papaya or how we call it in Puerto Rico, dulce de lechosa. I love making it and love eating it even more! Some pieces of dulce de lechosa with a piece of fresh Puerto Rican white cheese, is heaven!
Many people prefer to make their candied papayas using a green papaya. That is fine and makes a delicious candy, easier to handle. But I prefer to use the papaya closer to ripe. I learned that from my Mom, she also likes it with riper fruit. Not the soft ripe, still hard but yellow in color. To me it makes a softer richer candy and thicker darker syrup.
The first step is to soak the papaya pieces in baking soda. Baking soda helps to strengthen the skin of the slices so they won’t break much during cooking. There will be some pieces that break some, but it will be minimal compared as without soaking them in the baking soda. You can use any type of you sugar you prefer. I use raw (turbinado) sugar because is somewhere in between white and brown sugar. But you can use brown sugar, white sugar or a mix of both. White sugar is going to give you a much lighter syrup.
When adding your spices, be careful with the cloves. Last batch I made, I dropped 5 or 6 cloves by mistake and left them. It turned out spicier that normal, with a stronger clove flavor, but have to admit, I liked it! Husband didn’t care of it much, so more for me!
Accompany your candied papaya with a piece of cheese. Any of the latin white cheeses would go great with it. Gooda and cheddar work great too! The mix of the saltiness on the cheese with the sweet of the candy is fantastic! That was one of my dad’s most favorite desserts!
Dulce de Lechosa (Candied Papaya)
Delicious papaya in a tasty syrup, what is not to like? It goes perfect with a piece of cheese!
Ingredients
- 2 lbs papaya From green to almost ripe
- 1 tbsp baking soda
- 3 sticks cinnamon
- 2 whole cloves
- 2.5 cups raw (turbinado) sugar Or brown sugar
- 1 tsp vanilla extract
Instructions
-
Cut the papaya in halves. Peel the skin and with a spoon, remove the seeds and membranes inside. Cut the papaya into slices, approximately 1/2 to 3/4 inch thick.
-
Place all the pieces in a plastic container and fill it up with water and the baking soda. This will help the slices to stay together and not break up. Soak in the baking soda water for 1 hour.
-
After the hour is over, drain all the water and rinse with fresh water the pieces of papaya. You might want to rinse twice to make sure all the baking soda is removed from the papaya.
-
Set a pot in medium-high on your stove and place the papaya pieces, the sugar, cloves, vanilla extract and cinnamon sticks in the pot and start to boil Once is boiling, reduce the temperature to medium and cover, let it cook for 40 minutes. Stir the papaya pieces at least twice during that cooking period.
-
By this time, there should be a syrup forming cooking the papayas. Check if the papayas are cooked. If they aren't, let it cook covered for 10 more minutes. If they are, remove the cover and let it cook, stirring the papaya pieces gently and keeping an eye on your syrup. Let it cook for 20 minutes.
-
When the syrup is thick, and a beautiful caramel color, your candy is ready! Let is cook and store in the refrigerator. It will last for several weeks in the refrigerator.
Bat Wings – Halloweentastic!!

I wanted to make a Halloween episode. I wanted to make it last year, but ran out of time and it didn’t happened. So this year, we planned ahead. When it was time to figure out a recipe to make, I went thru a bunch of different ideas. Making meats bloody, side dishes gross, goulish desserts: but none of those ideas really worked in my head. Google to the rescue! I saw a bunch of people making bat wings. Most of the recipes were the same, but the idea was brilliant. So I thought, why not give it a try and make my own recipe.

First I thought of going with a Middle Eastern recipe. Then I thought of an Asian recipe. Couldn’t make up my mind. At the end, decided to make a recipe pulling ingredients from both cuisines. They turned out pretty good. I made them twice to make sure the recipe was a good one. Some adjustments were made to the second attempt to improve the recipe. The pictures here are from the first attempt. Second attempt was recording the video and let me tell you, it was a busy day, forgot to take good photos!

The best advice I can give you with this recipe is this: Watch the black food coloring!! It is probably the most important ingredient on this recipe because if makes the wings black that makes them “bat wings”! But the same way it will stain your wings, it will stain your hands, clothing, plastic container and even the kitchen counter! So be very careful when handling the coloring and the marinade after you add the coloring. I used stainless steal tongues to handle the chicken and they worked out great!
When placing the wings on the baking sheet, make sure you cover with aluminum foil. It is going to save you a lot of cleaning! When you bake the wings, the marinade is going to cook and get encrusted into your baking sheet. The aluminum foil will help you prevent all the extra cleaning. Also, spray the aluminum foil with cooking spray. Stucked wings to aluminum is not pretty!
When adding the pinneaple juice, got smaller and increase to your taste. First attempt I used half a cup and second attempt a whole cup. I liked the consistency of the marinade with the half cup better, it was thicker and stuck better to the wings. Use whole wings. The effect of the bat wings is best when you use the whole wing. When I was trying to recipe, I used cutted wings and didn’t look as batty!
"Bat Wings"
This is a fun recipe to convert chicken wings into bat wings, perfect for your Spooky Halloween Party! They will be great as an appetizer or as part of the main dish.
Ingredients
- 3 lbs chicken wings whole
- 1/4 cup olive oil
- 1/2 tsp cumin
- 1/4 tsp cayenne pepper Add up to 1 tsp for spicier wings
- 1 tbsp garlic paste
- 1/2 tsp cinnamon powder
- 1 cup honey
- 1 cup almond butter
- 1 tsp sea salt or to taste
- 1/2 cup pineapple juice
- 1/2 tsp black pepper
- 1 tsp black food coloring
- Non Stick cooking spray
Instructions
-
In a glass container mix all the ingredients except the chicken wings, adding the food coloring last.
-
In a large ziplock back, place the wings and pour the marinade on top. Lock the bag and spread the marinade to cover all the wings.
-
Marinade the wings in the refrigerator between 6 to 24 hours. The longer, the better.
-
Remove the bag with the wings and marinade from the refrigerator and let it sit at room temperature for 20 to 30 minutes.
-
Preheat the oven to 400 degrees F.
-
Take a large baking sheet and cover with aluminum foil. Spray with non-stick cooking spray.
-
Place the wings in a single layer on the cooking sheet, spreading the wings open. Save the marinade leftover.
-
Bake the wings for 25 minutes. Turn the wings. Cover the wings with the leftover marinade making sure you cover all of the wing. Place in the oven for another 25 minutes.
-
Serve them in your favorite spooky dish or bowl.
Recipe Notes
- Make sure you use the whole chicken wing and not cut into pieces. That will give the bat wing effect.
- The most important thing about this recipe is : Be careful with the black food coloring!!! It will stain your hands, plastic bowls or anything that can absorb the color. I use stainless steel tongues to handle the wings.
- You can adapt the amount of cayenne pepper to the spiciness you prefer. Also the amount of salt. Using 1/4 tsp of cayenne is not going to be spicy, just flavorfull.
- You don't have to use aluminum foil cover the baking sheets if you don't want to, but it will your life much easier. The marinade when it bakes is messy and will stick to your baking sheet. Also, do not forget the non stick cooking spray or the wings will stick to the foil.
- You can replace the almond butter with peanut or cashew butter, it will work well with either one of them.


Making this video was so much fun! I wanted to make a funny Halloween video and finally got it done! It take a village to do this much work, and thank goodness to my super talented husband that rolls with all the stuff I come up with. Being married to a musician, studio engineer and video editor is a big plus, I really recommend it! Also thank you to my good friends Aracelis and Ron Jaffe. They did the make up and kept me laughing the whole time! Make sure you also check the Buzzed Zombie Brain video, was made the same day and is as wacky as this one! Hope you enjoy it!! I can tell you, we sure did!
Rita’s Chili 2.0

Our friend Rita is one of the sweetest people you could ever meet! She lives in Missouri now, but was raised in Texas and Oklahoma. She has this recipe for chili that is outstanding! We make her chili on a regular basis in our house, is so good! So I took her recipe and gave it a few personal touches and here is it, Rita’s Chili 2.0.
The original recipe called for just ground beef. I like ground beef, but I have found that mixing ground beef with ground pork, makes a magical thing! It is a match made in heaven. The Angels sing when you cook beef and pork together. Ok, so that is a little too much, but you get my point, both meats mix really well. I have also mixed the beef with turkey to make it a little bit healthier and it works well. I keep the higher amount of meat being the beef. I find turkey a little bland, but that is just me. Chili is one of those soups that pretty much any kind of ground beef will work. I had venison chili once and it was really good. A friend sometime ago made a chili with rattle snake meat! And you know what? It wasn’t bad at all.

This recipe is super easy to make. It is all in one pot, and once you brown the meat with the onions, garlic and peppers, all what is left is dropping the rest of the ingredients and let it simmer. That easy! You could make it on your crockpot and let it cook slowly all day. But you don’t really have to. It doesn’t take that long for it to cook for a delicious bowl of chili!
I made usually this a little bit spicier. I do like some heat in my chili. But the husband doesn’t like food too spicy. So I cut the amount of red pepper flakes to 1 teaspon. That is going to give you a nicely flavored chili with a hint of heat. But just a hint. If you prefer more heat. use up to 1 tablespooon of the red pepper flakes. It will be a nice heat without becoming too much of a challenge. Of course. you can add more if you are use to that much heat.

Rita’s Chili 2.0!
This chili recipe is from our friend Rita. Her chili is awesome. I gave it my flair, that is why is Rita's Chili 2.0. It's a one-pot meal, very easy and simple to make.
Ingredients
- 1.5 lbs ground beef
- 1 lb ground pork
- 2 cups onion chopped
- 1 cup poblano pepper chopped (or green pepper)
- 3 Tbsp garlic minced or 2 tbsp. Garlic Powder
- 1 tsp Red Pepper Flakes
- 3 Tbsp Chili Powder
- 2 tsp. Cumin ground
- 1 tsp Coriander ground
- 1 tsp. Oregano
- 1 tsp Salt or to taste
- 32 oz. Red Kidney Beans 2- 16 oz cans, undrained
- 28 oz. Stewed Tomatoes 2 - 14 oz cans, undrained
- 15 oz frozen Kernel Corn 1 small bag
- 8 oz tomato sauce
- 1 tsp Pepper or to taste
- 1 Tbsp olive oil
Instructions
-
In large pot, brown ground beef, onion & green pepper to sauté them.
-
Then add other ingredients and simmer, stirring occasionally, until done, about 30 to 40 minutes.
Recipe Notes
I used lean ground beef and pork. It reduces the amount of fat on your chili. When you use 1 tsp red pepper flakes, you will have a mild tasty chili. If you prefer a spicier chili, increase the amount of red pepper flakes.
Braised Turkey Wings

One of my most favorite things to eat is turkey wings. They have so much flavor and contrary to the turkey leg, do not have all those ligaments that make the leg such a chore to eat. I mean, don’t misunderstand me, I will still eat a turkey leg! But turkey wings are so much easier. You have a smaller drummette, the middle section, and the wing tip. All of them are full of flavor. The turkey wing is my second most favorite part of the turkey, the thigh is my most favorite part.

When I cook turkey wings, I like to separate them into 3 pieces: the drummette, the middle part, and the wing tip. Many people like to cook them whole. But to me, they are easier to handle when separated. And easier to serve. I prefer to buy the turkey wings that come with all 3 parts, but in some stores, they have only the middle part and the wing tip. You gotta do whatever you gotta do to eat some delicious turkey wings, so I get whatever I can get my hands on.
Braising is a process where you first sear the meat to seal the flavors at a high temperature and then lower the temperature to cook the meat slow in some form of liquid. I usually use wine to braise because I love the flavour wine brings into any meat. Plus, I love wine, and there are always several bottles of wine in my house. You can use either white wine or red wine. I prefer dry wines, and if I feel like adding some sweetness, then I add dry figs, dates or prunes. But you can also use semi-sweet wines and it will work too. I wouldn’t use very sweet wines, it will make the sauce and the meat too sweet. The idea is to add a little bit of sweetness without taking over.
Sometimes I use beer and sometimes broth. It really depends on what you are cooking, and what inspiration you have that day. That is how I cook. I just let the meat talk to me and tell me what to do to it! I know, sounds coo-coo, but it works for me! Hehehe


I have two versions of the braised turkey wings. I first did the original recipe using a dutch oven, caldero for many Latin families. In my house growing up, my mom always had several calderos, different sizes and for different uses. I have never used a rice cooker to make rice, at home I always made it in the caldero. A caldero and a dutch oven are similar kinds of pots, they are big, but the caldero is usually made out of aluminum and a dutch oven made of cast iron. You can use either one, they take you to the same place when cooking. If you don’t have either, then use a large frying pan with a lid. Will not be as effective as the caldero or dutch oven, but it will do the trick.
The next day after I made the dutch oven version, we had company over for dinner and I still had raw turkey wings left. I decided to make another batch, but this time I didn’t have the luxury of cooking it for a long time since it was after work. That is why you need an Instant Pot pressure cooker! It cooks everything so much faster, it reduces the cooking time big time. And you know what, they came out as delicious as the original. I changed the recipes a little bit and both of them are posted here. You can interchange your cooking tool with the recipe you prefer.
Braised Turkey Wings - Dutch Oven Version
This recipe is a simple way to braise turkey wings in a dutch oven or a caldero. The wings come out tender and juicy, the sauce is very thick and the whole thing is delicious!!
Ingredients
- 5 lbs Turkey wings
- 1 tsp Sea Salt
- 1 tsp Black Pepper
- 1/2 tsp Sage
- 1 tsp Thyme
- 1 tsp Garlic Paste
- 4 Carrots large and fat
- 2 Onions large
- 1.5 cup White Wine Slightly sweet or Dry
- 1 tbsp Olive Oil
Instructions
-
Season the turkey wings with the sea salt, black pepper, sage, thyme, garlic paste and 1 tbsp olive oil.
-
In a dutch oven (caldero)or a large frying pan, set the temperature to high heat, drizzle some olive oil and brown the wings on both sides (around 7-9 minutes per side).
-
Once all the wings are brown, add the onions, carrots and white wine. Lower the temperature to medium heat and cover. Let it cook for 30 minutes.
-
Uncover the pot and flip the wings upside down to make sure everything is under the sauce. Cover the pot and cook for 25 more minutes or until the wings are tender and the sauce is thick.
Recipe Notes
You could replace the garlic paste for garlic powder.
Do not use really sweet wines, slightly sweet or dry is your best bet for flavor. You could also use slightly sweet or dry red wines. Your sauce will be darker, but just as delicious.
Braised Turkey Wings - Instant Pot Version
This is a version of my original Braise Turkey Wings Recipe, using a dutch oven. In this recipe, I shorten the cooking time by using an Instant Pot (electrical pressure cooker). There are some alterations to the original recipe, but both recipes are absolutely delicious!!
Ingredients
- 5 lbs Turkey wings
- 1 tsp Sea salt
- 1 tsp Black pepper
- 1/2 tsp Sage
- 1 tsp Thyme
- 1 tsp Garlic paste
- 4 Carrots large and fat, cutted in 1 inch (2.5 cm) pieces
- 2 Onions large, cut into big pieces
- 2 tbsp Olive oil
- 15 Dried Figs Or dates if you prefer
- 1.5 cup Red wine Dry
Instructions
-
Season the turkey wings with the sea salt, black pepper, sage, thyme, garlic paste and 1 tbsp or olive oil.
-
In a large frying pan, drizzle some olive oil and at high temperature, brown the turkey wings on both sides (around 8 minutes per side)
-
Once all the wings are browned, place them in the Instant Pot.
-
In the same frying pan, at high heat, lightly saute the onions for 5 minutes.
-
Add the onions, carrots, figs and red wine into the Instant Pot and lock the pot. Set the Manual setting to 25 minutes.
-
After the 25 minutes, let it sit for 10 minutes, release any pressure left and unlock the pot. Stir the wings and all the ingredients into the sauce to cover everything.
-
Lock the pot and cook in Manual setting for 9 minutes. After the 9 minutes, let the pot sit for 10 minutes and release any pressure left. Unlock the pot and your wings are ready!
Recipe Notes
You can use dried figs, dates, apricots or prunes.
Use dry red wine. The dried fruit is going to provide the sweetness to balance the sauce. Sweet wines might make it the sauce too sweet.
You could use the Saute setting on the Instant Pot to brown your wings and onions. I prefer a large frying pan because of the size, I can do more at the same time. But the Saute setting will do the trick.
Sunny Potato Bake


Last Spring I made a ham on the oven. It smelled so good as it cooked. I love glazed ham, it is one of my most favorite things to eat. Usually, I make my homemade potato salad to go with it. But that Spring day I was not feeling it. I wanted something different, something warm, aromatic, with some cheese but not swimming on it. That is when I decided to make my Sunny Potato Bake. It is very simple to do, the aroma while it bakes is intoxicating and all the times I have made it for friends, there has been none left! So I know that is a winner! This is could also be a very nice main dish. If you are vegetarian that is Lacto ovo vegetarian, this is a perfect dish for you!
I use red potatoes when I make my potato bake. I love red potatoes with their skin. To me, the skin adds to the flavor and texture of the potato, not to mention the fiber and minerals. Some potatoes skins are tougher, but red potatoes are soft and delicious. You can use other types of potatoes, something starchy and somewhat waxy, that will stay together when you bake it sliced. Yukon gold, Inca gold, and new potatoes are good replacements for the red potatoes. When you slice them, make sure you are slicing them thin, around 1/8 of an inch. If you cut them pretty thick, they will not take the flavor of the cheeses and herbs as well as thin cuts. I usually cut them by hand, but last time I made them used my Cuisinart food processor and it was incredible how fast it was to slice!

When I first envision the potato bake, I thought of cheddar cheese. Potatoes and cheddar cheese are a match made in heaven. But that day, I was not feeling the cheddar. I wanted something more exotic in flavor, something more Mediterranean. That is when I decided to use feta. I was doubtful first since had never baked anything with feta, but it was an awesome surprise when it came out! The mix of the feta with the herbs, sundried tomatoes and onions created a flavor that went perfectly with the potatoes. Even a friend that is not a huge fan of the feta liked how it went with the potatoes. You could also use cheddar or mozzarella, I am sure they will be awesome either way.
I had pecorino in my kitchen and it was a good decision. It worked perfectly with the feta. But I am sure if you use parmesan or romano you won’t be mad! All three of them are delicious! When layering the potatoes and other ingredients, make sure you are covering the whole baking dish. Do not stack thick layers of potatoes, it works best when you have several thinner layers. Think of lasagna, thinner layers all full of flavor. And when spreading the other ingredients over the layers of potatoes, spread them to make sure you cover all of it.

Jade Noodles (Happy Bowl)
")

Welcome to 2019! A little bit late, but better late than never! This year I have decided to learn things I have not done much before. I am practicing baking more than before. And vegetarian cooking is one of those things I have always been curious about. I can make a few vegetarian dishes, but really want to increase my repertoire. Not knowing much about vegetarian cooking, I went to my expert, my great friend Kendra Musselle, Actress extraordinaire, Goddess of the Universe, Mistress of the Vegetarian Kitchen! We talked about it, she sent me some recipes, I picked one I liked and on a Sunday we got together and cooked this delicious bowl of goodness Kendra calls Jade Noodles, but we decided to rename it Happy Bowl!
Happy Bowl is a mix of tofu, noodles and lightly blanched green vegetables in this delicious Asian sauce. I have to admit when Kendra told me tofu I was like “Tofu? Hmmmm, I am not sure about that.” I had tofu before and it wasn’t always an inspiring situation to try it again. It wasn’t until Kendra taught me how to address the tofu that I realized why I didn’t care much for tofu before. Tofu doesn’t have much flavor and the consistency is different. It comes in several types of consistencies: silken, regular, firm, extra firm and super firm. The silken type is soft almost like cream cheese. The super firm has the consistency of meat, it is dense. What makes them different is the amount of water in the tofu.

Think of tofu as a sponge. The wetter the sponge, the less amount of extra liquid is going to absorb. But the drier it is, the more chances it has to absorb extra liquid. So when we made this dish, we needed the tofu to be relatively dry so it could absorb the sauce. We wanted the tofu to be firm so it would not fall apart when cooking it, that is why we decided for the extra firm. What we did, is we first drained the liquid from the tofu. Then placed the block of the block in a towel so it could absorb the liquid. Wrapped the tofu in the towel, placed a plastic bag on top of the towel and put a relatively heavy book on top of it. The idea is for the weight of the book to force the liquid out of the tofu. We did that for 15 minutes and then chopped the tofu into 1/2 inch squares, bite-size, easy to eat and easy to absorb the sauce.


We are using tofu for this recipe but it could very easily be replaced by chicken breasts, shrimp or even pork chunks. The important part is to set them in the sauce to marinade before cooking them. If you are using any of these meats, I would let them marinade for at least 1 hour so they can absorb the flavors. The tofu doesn’t need as long to marinade as the meat does.
Make sure you use good quality virgin olive oil and sesame oil. Crappy oils will alter the flavor of your food. We used soy sauce in this recipe, but you could also use liquid amino acids or ponzu sauce. They are all pretty close in flavor. Liquid amino acids are a way many vegetarians have to get certain amino acids they are not getting on their diet. Ponzu sauce is a citrusy sauce that is used in Japanese cuisine. I love it over rice! Yummm!!
Lemongrass is a common ingredient in Asian food. And it is part of the sauce for this recipe. But who has the time to smash lemongrass and paste it? I know I don’t! That is why I used lemongrass in a tube!! It will make your life so easy and I have found myself cooking other recipes that call for lemongrass since it is so easy to add from the tube. Same thing with the ginger. Ginger in a tube is fantastic. Trader Joes Ginger Paste is really good and will save you a lot of time!
When it comes to pasta, you can use any noodle you wish: soba, rice noodles, linguini, thin spaghetti or any noodle you like. We used this awesome Chickpea rotini pasta from Banza that I love! It is all made from chickpeas, so it is high in protein and if you have issues with gluten, they are gluten-free. It cooks just like regular pasta and tastes delicious!!
You can use pretty much any vegetables that you like. But since they are Jade Noodles, we stayed with green vegetables. Since you are blanching them lightly, they retain all the vitamins and minerals that are so good for you. For garnishes, we used avocados (because I LOVE avocados), cilantro (I LOVE Cilantro), sesame seeds and scallions (green onions). You could also use toasted peanuts, crunchy rice noodles or anything that tickles your fancy.
Jade noodles (“Happy Bowl”)
This delicious bowl of pasta, tofu, and vegetables is so simple to make and very tasty. The tofu is drained and pressed so it absorbs the Asian flavors on the sauce.
Ingredients
Ingredients:
- 14 oz block extra firm tofu drained and pressed
- 8 oz dry noodles linguini, soba, thin spaghetti, rice noodles, bean noodles etc.
- 1/3 lbs. asparagus dice bite size
- 1/3 lbs. snow peas
- 1 lb. broccoli diced bite size
- 8 oz shelled edamame
- 1 cup handfuls fresh baby spinach
- 3 scallions sliced
- garnishes: avocado sesame seeds, cilantro, sprouts (optional)
Sauce:
- 2 tbsp olive oil
- 2 tbsp sesame oil
- 1/3 cup soy sauce ponzu sauce or liquid aminos
- 1/4 cup rice wine vinegar
- 1 tbsp lime juice
- 2 tbsp lemongrass
- 2 tbsp ginger
- 2 tbsp chili sauce
- 1 tbsp sriracha
- 2 cloves garlic minced
Instructions
-
Dice tofu into small cubes, approximately ½ inch.
-
Mix all the ingredients for the sauce in medium bowl. Add tofu cubes to marinate for 15 -20 minutes.
-
Cook pasta in large pot.
-
In a pan, cook the tofu with the sauce for 5 minutes or until it starts to boil. Turn heat off.
-
During the last couple minutes of pasta cooking, add broccoli, asparagus, snow peas, spinach and edamame to water to blanch, until they turn bright green, 2-3 minutes.
-
Drain well and place in large bowl.
-
Pour tofu and sauce over the top.
-
Add scallions and mix together well.
-
Serve in bowls and garnish with avocado, sesame seeds cilantro and sprouts.
-
Add extra siracha or soy sauce (optional).
Recipe Notes
We used chickpea pasta, but you can use any pasta of your liking. If using linguini or any long pasta, would be best to break it into smaller pieces.
If you prefer not to use tofu, you can replace it with chicken breast, shrimp or even pork.
Roasted Butternut Squash Soup


I love soup. You give me a bowl of warm soup and I am your best friend! Warm soup. Not cold soup. I can’t stand cold soup. Or tomato-based soups. I am sorry for my Italian friends but do not like Minestrone soup. Or tomato bisque. Nope, I will pass on both. But other than those, I love me a nice warm bowl of soup.
Years ago I went to a restaurant and ordered my first bowl of butternut soup. It was ok, it wasn’t bad, but it needed something. So I went home determined to come up with a recipe for butternut squash soup. Throughout the years, I have tweaked until it is the beauty that I make today! I am always tweaking recipes. I guess is the scientist part of me, always tinkering with recipes to improve the taste, the texture or the look. But I digress.
The first time I made this recipe, I made it with Calabaza (Caribbean or West Indies squash). Growing up, calabaza was a staple in our house. My mom would boil it, put it in beans or make it in fritters. My grandma Berta would make the most delicious “torta de calabaza”, a crustless squash pie that it was to die for! So when it was time to make my first squash soup, it was natural I used calabaza. And you know what, it came out fantastic!! I loved it! So then, it was more time to experiment and I made the soup using other squashes and pumpkins: acorn, butternut, buttercup, and Kabocha (Japanese pumpkin). And the result: they were awesome!! You can make this soup pretty much with any of those, it will turn out delicious!
I added sweet potatoes to the soup to help give it a little more body. Squash can be a little watery, so the starch from the potatoes will help give firmness to the soup. And roasted potatoes go so well with squash, they enhance each other’s flavor!
-04-1920x1080")
I prefer to roast the squash and sweet potatoes before cooking into the soup. Roasting highlights the sugars on the squash and makes the flavors pop! I cook it with skin and then just scoop it, but you could peel it and cut it into pieces if you prefer. You could use a can, or boil them, but you will be missing a lot of flavor and nutrients.
You will need some kind of blending machine to run your soup through. You could have the soup chunky if you prefer it that way, but it is so much better when it silky and smooth. I used my blender, but you could use a food processor or an immersion blender. They both will do the trick. An immersion blender would the best because it will save you the extra step of pouring into blender back and forth. When you are cooking the soup, one good word of advice: watch out! It is HOT! That deliciousness starts to bubble and if it falls on your skin, you will remember it!
Don’t throw away the seeds! Roasted, they are so good. I included a recipe on how to roast the seeds, is very simple and adds crunchiness to the soup. I love it!

Roasted Butternut Squash Soup
This time of the year, with such abundance of pumpkin and squash, why not warm yourself up with a hearty velvety delicious soup. I am using butternut squash and sweet potatoes, but it can easily be replaced by acorn squash, baking pumpkin, Calabaza (Caribbean squash) or any other squash you enjoy. The soup is creamy, warm and will lift your spirits!
Ingredients
Roasted Butternut squash and sweet potatoes
- 4 lbs butternut squash 1 large
- 1.5 lbs sweet potatoes 2 medium
- olive oil
- salt
- pepper
Soup
- 1 cup onions chopped
- 1 cup carrots chopped
- 1 tsp garlic minced
- 1 tsp ginger minced
- 2 tbsp butter
- 1 tsp olive oil
- 1 tsp thyme
- 1 bay leaf
- 4 cups chicken broth
- 1 tbsp brown sugar optional
- ¼ tsp cinnamon
- ¼ tsp allspice
- 1 cup half and half
- Salt
- Black pepper
Instructions
Roasting
-
Preheat oven to 400 degrees F. Cut the squash from top to bottom and scoop all the seeds. Cut the sweet potatoes lengthwise. Place all the parts in a baking sheet and drizzle with olive oil, salt, and pepper. Cook in the oven for an hour or until the squash and sweet potatoes are easily pierced by a fork or the tip of a knife.
-
Once they are cool, spoon them into a container and discard the skins.
Soup
-
In a large saucepan, melt the butter, add the olive oil and sauté the onions, carrots, garlic, and ginger. Cook until softened. Season with salt, pepper, and thyme.
-
Add the bay leaf, the roasted squash, sweet potatoes, and chicken broth and simmer for 20 minutes. using an immersion blender, blend soup until creamy. If you do not have an immersion blender, carefully transfer batches of the hot soup to a blender.
-
Return the soup to the saucepan and add cinnamon, allspice and half & half. Simmer for 15 minutes.
-
Garnish with roasted butternut squash seeds and cracked black pepper.

Roasted Butternut Squash Seeds
Why throw away the seeds from your squash, when you can roast them? It is very simple to do and they are delicious.
Ingredients
Ingredients:
- 1 cup butternut squash seeds
- 1 tbsp olive oil
- Salt
- Pepper
Instructions
Instructions:
-
Preheat the oven to 275 degrees F (135 degrees C). Line a baking sheet with parchment paper or aluminum foil.
-
After removing the seeds from the squash, rinse with water, and remove any strings and bits of squash. Pat dry, and place in a small bowl. Stir the olive oil and salt into the seeds until evenly coated. Spread out in an even layer on the prepared baking sheet.
-
Bake for 15 minutes, or until seeds start to pop. Remove from oven and cool on the baking sheet before serving.
Recipe Notes
You can do this with the seeds of any squash or pumpkin. Add a little of cayenne pepper for spicier seeds. If you want them a little bit crunchier, increase the temperature to 300 degrees F and roast for 15 minutes or until you reach the desired crunchiness.
Coconut Rum Cake


There is coconut. And there is cake. And Rum. What is not to love?! This coconut rum cake is outstanding! Some time ago one of my ex-coworkers brought this delicious cake to the office and we were all in love! Even though it didn’t have rum, it was still delicious. So I asked him for the recipe. I brought it home, and my husband, who is more of the baker in our home, tweaked the recipe, and amongst other things, added the rum and voila! Delicious coconut rum cake!
I have brought it to many parties. And gifted it for the Holidays many times. It is just a very easy to make cake that travels easily and wraps perfect for a special gift.

I use coconut rum. But you can easily make it without the rum if you aren’t interested in the rum part. Just replace the rum with water, it works the same. But if you prefer the rum, you don’t have to limit yourself to coconut rum. My husband prefers it with spiced rum or dark rum and it is delicious. It’s not as “coconutty” in flavor as when you add the coconut rum, but the flavors of the other rums add a different dimension that you will not mind!
Buttermilk is not something that I always have in my refrigerator. And sometimes, when inspiration hits, I don’t want to make a trip to the grocery store. I would much rather use what I have at home. So I have learned to come up with substitutions for the buttermilk that works almost as good. Almost. For example, you can use a cup of whole milk and add 1 tbsp of either white vinegar or lemon juice and let it sit for 5 minutes until it curdles. Or you can replace the buttermilk with plain yogurt. Both of those work really well and will not greatly change the taste of your cake.
This episode is a very special one. My friend Ron Burgandy offered to record and direct this episode and of course I said Yes!! He is brilliant! He is the owner of Studios KRP (http://www.studiokrp.com) and his films and videos are superb! This episode is filmed in 4K and his ideas were so much fun! I am sure you are going to enjoy it as much as we did! Also, we got the pleasure of having one of my best friends, Zumba Celina (https://www.facebook.com/ZumbawithCelina) make an appearance in the video. She is much loved and I am so happy she was able to join me!
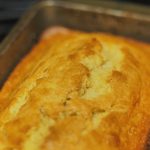
Coconut Rum Cake
This is an awesome cake, great coconut flavor! The glaze can be made with coconut rum, or if you prefer nonalcoholic, you can replace the rum with water. It will be as delicious either way!
Ingredients
Group 1:
- 2 eggs
- ½ cup oil
- 1 cups sugar
- 1 tsp. coconut flavoring
- 1 tsp vanilla
Group 2:
- 1.5 cups flour
- ¼ tsp. baking powder
- ¼ tsp. baking soda
- ¼ tsp. salt
Group 3:
- ½ cup Baker’s shredded coconut
- ½ cup buttermilk
Glaze:
- ½ cup sugar
- 1 tsp. butter
- ¼ cup coconut rum or water
- ½ tsp. coconut flavoring
Instructions
Cake:
-
Preheat oven to 350 degrees.
-
Grease and Flour a non-stick loaf pan.
-
Mix the ingredients in separate bowls following the groupings above.
-
Combine group 1 and 2 into a larger bowl and mix thoroughly. Add group 3 last and mix thoroughly. Fill greased and floured loaf pan. Bake cake in preheated oven at 350 degrees for 45-50 minutes or until inserted knife comes out clean.
Glaze:
-
Mix rum, sugar and melted butter in a pan until dissolved. Just barely boil the rum until the sugar dissolves as not to boil off all the alcohol. If using water, mix the ingredients and boil until sugar dissolves. Add in coconut flavoring last.
-
With a toothpick, poke small holes in the top of the cake. Pour the hot glaze over the top of the warm cake while still in the pan. The glaze will ooze down around the cake and soak into the cake from the top, and sides. Cool and remove carefully.
Quinoa with Onions and Mushrooms


I hear people complain about quinoa. Most don’t like it because is too bland. Or too hard. But the real reason is that they are not making it right. Quinoa without any seasoning is boring and bland. Is not any different than rice. If you don’t put some seasoning, is not that much fun to eat. That is why I created this delicious recipe! It is like a risotto, but with quinoa instead of rice. The onions and the mushrooms add texture and the cream of mushroom makes it velvety and moist.
Something that makes this recipe pop: the truffle oil! For many years I never used it. Didn’t know what it was. But one day decided to get me some. And guess what? I love it! It is musky and full of flavor. It enhances your recipe with or without mushrooms. But at the same time, it can be pricey, or difficult to find. No worries! If you don’t have truffle oil, then use olive oil. You won’t have the muskiness of the truffle oil, but the freshness of the olive will give a different dimension to your dish.
Quinoa with Onions and Mushrooms
Quinoa doesn't have to be bland! This recipe is similar to risotto, creamy and delicious. The onions and mushrooms add a nice texture.
Ingredients
Quinoa
- 4 cups chicken broth
- 2 cups quinoa
- ½ tsp salt
Onion and Mushroom Mix
- 1 cup onion chopped
- 1 cup baby Bella mushrooms chopped
- 10 oz can of cream of mushroom
- 2 tbsp truffle oil
- ½ cup parmesan cheese
- ¼ cup cilantro chopped
- 1 tbsp olive oil
- ½ tsp Salt
- ½ tsp Pepper
Instructions
Quinoa
-
In a pan, boil the chicken broth.
-
Once the broth is boiling, add the quinoa and salt. Reduce the heat to medium. Cook for 15-20 minutes or until the quinoa is dry and completely cooked.
Onions and Mushroom Mix
-
In a separate pan, pour in the olive oil and sauté the onions until they are translucent at Medium-High heat.
-
Add the mushrooms and cook for 5 minutes. Reduce heat to Medium.
-
Add the cream of mushroom soup, truffle oil, salt, pepper and mix them thoroughly.
-
Once the quinoa is cooked, add it into the onion and mushroom mix until it is all blended together. Add the parmesan cheese and cilantro. If the quinoa has the consistency of risotto, it is done. If not, cook it 5 more minutes uncovered.
Crunchy Chicken


Fried chicken is awesome! I love it! But I don’t make it at home. I hate how the kitchen ends after done frying. And the whole house smells like fried chicken for hours after. So I either bring it home from somewhere already made or eat it at a restaurant. I have to admit, as much as I love it, I always eat it with a small amount of guilt. Big enough to make me think about it, but not big enough to stop me from eating it. “I should be eating baked chicken.” ” Lower in calories.” ” Better for you!” Yeah yeah yeah, but it is not as delicious as fried chicken. Until this recipe! This recipe has all the goodness of fried chicken, is crunchy, with a delicious crust that is tasty and a little spicy. And so easy to make, it is a breeze!
Crunchy Chicken
This is a terrific substitute for fried chicken, all the crunch and flavor, but none of the guilt or greasy stove from all the frying!
Ingredients
- 4 chicken breasts skinless
- 4 cups corn flakes
- 1 tsp salt
- ½ tsp black pepper
- 1 tbsp garlic powder
- ½ tsp sage powder
- ¼ tsp rosemary powder
- ½ tsp oregano powder
- 1 tsp paprika
- ½ tsp cayenne pepper
- 2 eggs
Instructions
-
Turn oven on at 350 degrees F
-
Clean and trim all visible fat from each chicken breast.
-
In 1-gallon zip lock bag, crunch the corn flakes into very small pieces.
-
Add salt, black pepper, garlic, sage, rosemary, oregano, paprika and cayenne pepper into the bag and mix thoroughly.
-
Beat eggs in a small bowl or plate and coat the chicken with the egg.
-
Place the chicken breasts into the bag with corn flakes and spices and stir until all chicken breasts are covered with the mix.
-
Place chicken breasts in lightly greased baking sheet.
-
Bake at 350 degrees for 35 minutes or until the meat is no longer pink.
I make this recipe with chicken breasts. But you could use chicken thighs and it would be as delicious! You could leave the skin on if you want to. I just find the corn flakes stick better to the chicken without the skin.
I have replaced the eggs for coating the chicken with buttermilk. I have also used half and half. They don’t work as well as the egg, but if you leave the chicken a little longer in the buttermilk or the half and half, the corn flakes will mostly stick. Once you take your chicken breasts from the bag and place in the baking sheet, take the leftover corn flakes in the bag and encrust them on the chicken. Even if they don’t completely stick, the flavor is so good, it will be really crunchy and you will want to eat it!
Meatloaf that will rock your world!

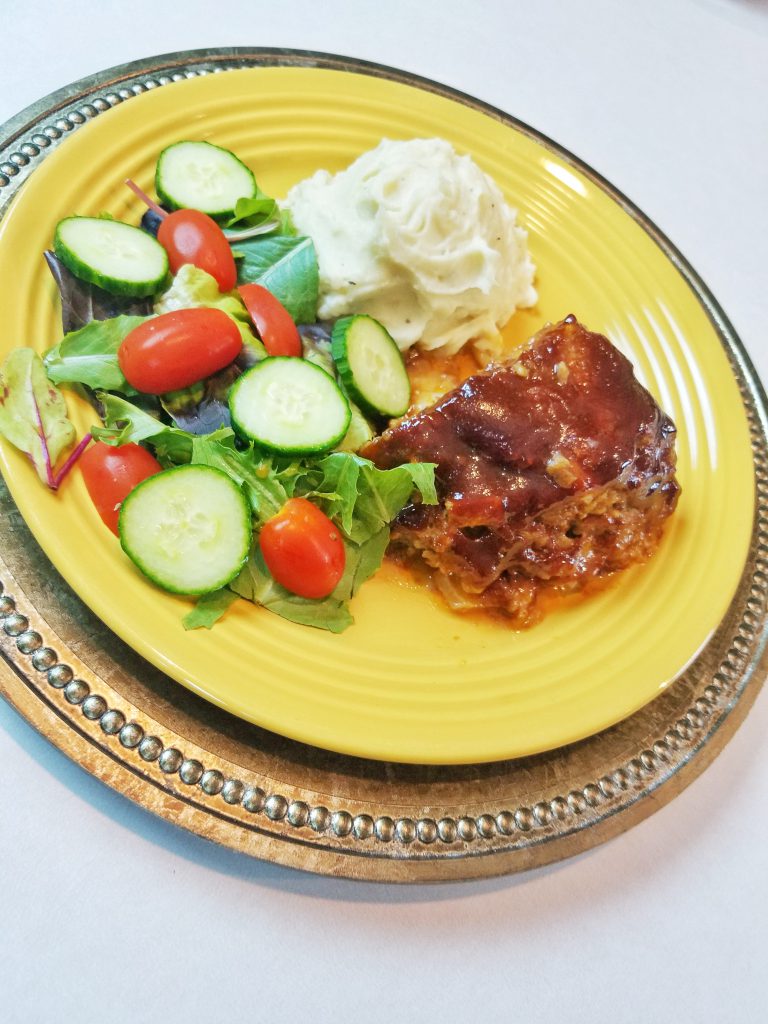
I love meatloaf. But so many times, the loaf is so dry and the sauce is just meh. Not this meatloaf. This meatloaf is juicy and moist. The sauce is savory and sweet. My husband Doug had a cousin Judy that was one of the nicest people in the world! And in addition to that, she had an awesome recipe for meatloaf. I took her recipe and tweaked it some and here is the result.
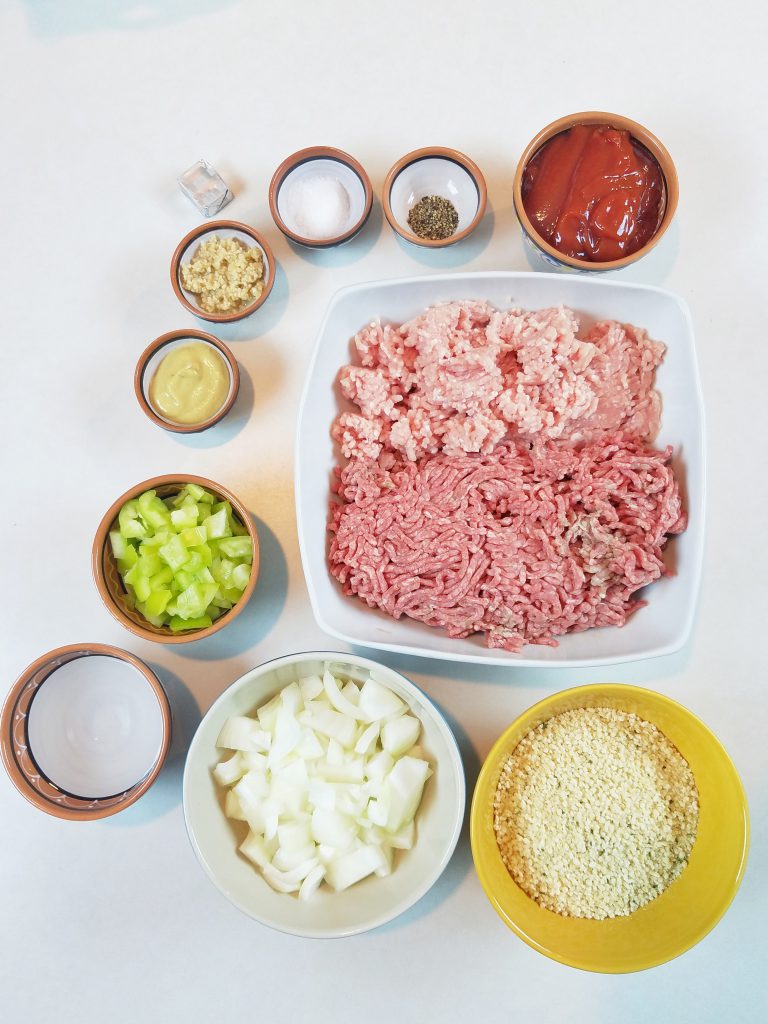
I am using ground beef and ground pork for this meatloaf. I like what the ground pork does for the beef. Increases the flavor and the moisture. You replace the beef with turkey or chicken and works as well. When I have made it with turkey, I added the pork. Ground turkey can be a little bland and I found out the pork brighten up the mix and turned out perfect. But then, I love pork, so anything with pork is a winner in my eyes!!
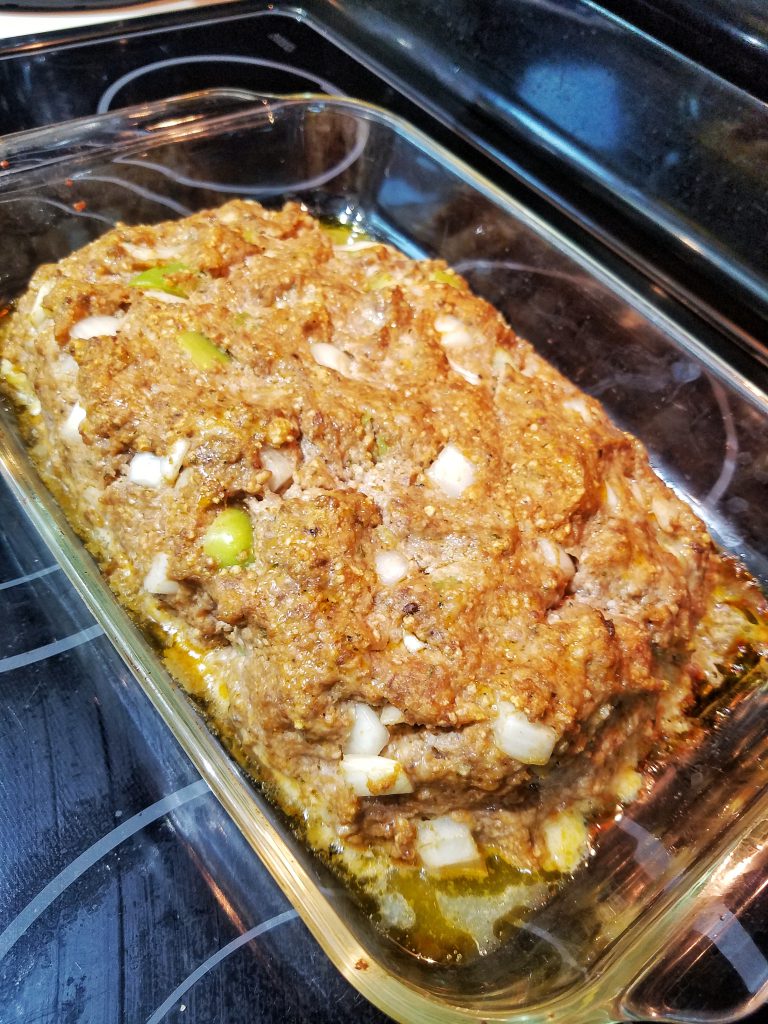
Onions and peppers into a meatloaf are not very common. But that is the beauty of this recipe. The addition of the onions and the peppers improves the moisture and makes the meatloaf juicy. I also like to season the meat with some of the ingredients in the sauce, the flavors will spread not only on the top but in the inside too. When you using breadcrumbs, you can use Italian, regular or gluten-free, really doesn’t make much of a difference. I have also used panko crumbs and no difference. I have made it with cooked quinoa and I like it the best. For me anyways. It holds everything together and adds a little texture that I really liked. So you have choices.
When you finish baking your meatloaf, there is going to be some juice at the bottom of the mold. Do not throw it out!!!! You want to put some of that juice on top of the slices of meatloaf when you serve it. It extra flavor you don’t want to remove.
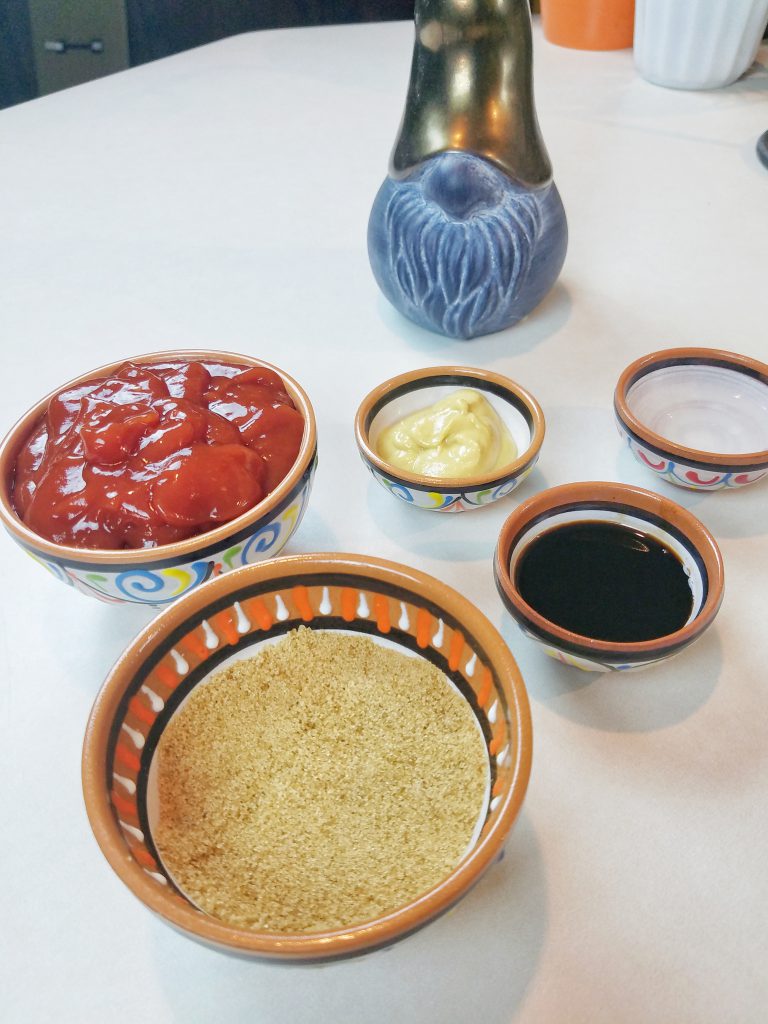
Ingredients
Loaf
- 1.5 lb ground Beef
- 1 lb ground pork
- 1 cup onion
- ½ cup green peppers
- 1 1/2 cups bread crumbs
- 1/2 cup water
- 3/4 Cup ketchup
- 2 tbsp dijon mustard
- 1 tsp. salt
- 1/2 tsp. pepper
- 2 tbsp minced garlic
- 1 tbsp beef bouillon
- 2 eggs
Sauce
- 1 cup ketchup
- 1/4 cup brown sugar
- 1.5 tbsp dijon mustard
- 1 tbsp water
- 1.5 tbsp balsamic vinegar
Instructions
Loaf
-
Mix all loaf ingredients together & form meatloaf in 9" x 13" pan. Bake at 350 degrees F for 25 minutes.
Sauce
-
Mix all the sauce ingredients and pour over loaf. Bake an additional 30 minutes at 350 degrees F. Let it rest for 10 minutes before cutting and serve.
Chicken and eggplant Stew

My mom is an incredible cook! She just knows how to make everything so good that you can’t just have one serving. She was my first inspiration for learning how to cook. She taught us kids how to make some of the basics. She always said that if you know how to cook, you can survive anywhere!
She makes a version of this recipe but with pork chops that is out of this world. I took her recipe and added a few more things, and I use chicken legs instead of pork chops. I have made it with both pork chops and pork chunks. Every single time I make it, it turns out to be a masterpiece. If you want to make it vegetarian, use some tofu cubes and replace the chicken bouillon with vegetable bouillon. Reduce the cooking time when using tofu. And even though in the video I made it with brown rice, you can accompany the stew with many things: white rice, mashed potatoes, boiled potatoes, cassava, beets, or parsnips, and on and on. I even have a friend that is cutting carbs and puts it on top of her salads! It goes great with everything.
I prefer to use chicken legs and thighs because dark meat is so more flavorful than white meat. You can use boneless, but to me, bones are the way to go. They add more flavor. Remove the skin and trim most of the fat from them before cooking. If you leave all the fat, you will have a layer of liquid fat on top of your stew and it is a chore to remove it all. A little bit of fat goes a long way.
The base for the recipe is the sofrito. Sofrito is something that you can use to make stews, beans, yellow rice, and soups. You can buy sofrito in some Latin grocery stores. This sofrito is full of flavor and spice, and you will not find it premade in any store.
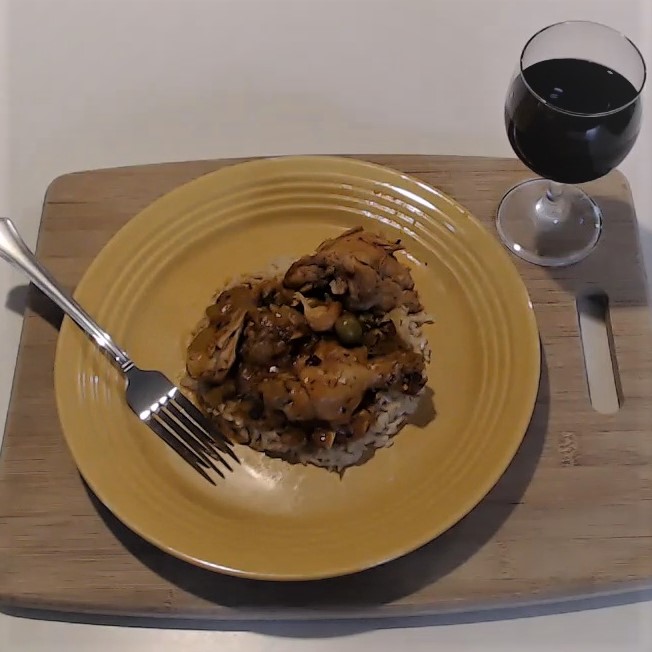
Chicken and eggplant stew
A delicious stew using a sofrito base. It is adaptable to any protein of your choice.
Ingredients
Sofrito
- 2 tbsp olive oil
- 1.5 cup onion
- 1 cup green pepper
- 2 tbsp minced garlic
- 1 tbsp ham bouillon
- 1 tsp coriander ground
- 1 tsp basil
- ½ tsp smoked paprika
- 1 envelope Sazon
- 1 cup tomato sauce
- 3 bay leaves
- 1 tbsp oregano chopped
- 1 tbsp culantro chopped
- 2 tbsp Spanish alcaparrado
- ¼ tsp Cayenne pepper
Stew
- 3 cup eggplant peeled and cubed
- 5 chicken leg quarters skinned, trimmed and cut
- Salt
- Pepper
- 1 cup wine
Instructions
-
In a large pot, heat the olive oil. Once the oil is hot, add the onion, pepper, and garlic and sauté until the onions are translucent. Lower the heat to Medium.
-
Add bouillon, coriander, basil, paprika, Sazon, stir and cook for 2 – 3 minutes.
-
Add the tomato sauce, bay leaves, oregano, culantro, cayenne pepper and Spanish alcaparrado. Cook for 5 minutes.
-
Season the chicken leg quarters with salt and pepper.
-
Add the chicken to the pot, covering it with the sofrito.
-
Add the wine, stir and cover the pot. Cook for 20 minutes or until the sauce starts to thicken.

-
Peel the eggplant and cut into small ½” cubes.
-
Add the eggplant cubes into the stew and stir. Cover the pot and cook for 20 more minutes.
-
The stew is ready when the chunks of eggplant are soft like pillows and the sauce is thick.
Recipe Notes
Serve over rice (brown rice recipe is included in this video), potatoes or any tubers or vegetables of your choice.
Black Bean Hummus


Black Bean Hummus is addictive! It is so good and easy to make, it will become one of your go-to recipes. My friend Prissy brought it to a party and it was so good, it was all gone in no time! She shared her recipe with me and then, like any good chef, I gave it my own flare. It is a little spicy, which mixes well with the garlic flavor and the earthiness of the cumin and coriander. It is a fresh addition to your party or any meal! It’s DELICIOUS!
This recipe is easily made in a food processor. If you don’t have one, a blender will do the job, just divide your ingredients into small batches and then mix all in a bowl.
When adding cayenne pepper, if you are not a fan of spicy food, start with adding ¼ of a teaspoon to the blend and taste. If it is not spicy enough, or you can take a little more heat, add the rest of the cayenne. Start with 1 teaspoon of salt and 1 tablespoon of pepper and then add more if needed. Salt is necessary to bring the flavors together.
Ingredients
- 30 oz black beans rinsed, drained
- 2 tsp lime juice or lemon if you prefer
- ¼ cup fresh cilantro chopped
- 2 tbsp culantro chopped
- 4 green onions sliced
- 2 tbsp olive oil extra virgin
- 4 large garlic cloves minced approx 2 tbsp
- 1 tsp ground cumin
- 1 tsp ground coriander
- ½ tsp cayenne pepper start with a bit less, then add to taste
- ½ cup tahini sesame seed paste (optional)
- 1 tbsp Fresh ground pepper to taste
- 1 tsp Salt to taste
Instructions
-
Add all the ingredients into food processor.
-
Pulse food processor until all the ingredients are mixed into a thick paste.
-
Add more olive oil if hummus is too thick.
Brown Rice


Brown rice is so good! I love white rice, but once I tried brown rice, I got hooked. Brown rice is high in fiber and considered a whole grain. It has a nutty aroma, a chewy texture, and many essential nutrients. I like to season my rice so it saves me from having to make beans or something else to go with the rice. I am using chicken bouillon but if you are a vegetarian, you can always use vegetable bouillon or just salt, just increase the amount of salt to at least 1 tsp. I prefer to use long grain brown rice, but if you prefer shorter grain, just increase the amount of water to 2 ½ cups of water per cup of rice. This recipe will make 3 cups of rice.
When cooking brown rice, patience is a virtue. If you try to cook your rice fast, it will dry up and will not cook all the way. Nobody likes crunchy uncooked rice!
Ingredients
- 2 cups brown rice long grain
- 4 1/2 cups water
- 1 tbsp chicken bouillon
- 1/2 tsp sea salt
- 1 bay leaf
- 1/4 cup olive oil
Instructions
-
Put the water to boil in High heat.
-
Add the chicken bouillon, salt and bay leaf in the water while you boil it and make sure you stir it until it dissolves in the water.
-
Once the rice is boiling, add the rice, cover the pot and reduce to Medium heat.
-
Cook for 30 minutes or until most of the water is absorbed by the rice.
-
Add the olive oil and stir, making sure all the oil is covering all the rice.

-
Cover the pot with the lid and cook the rice for around 15 more minutes or until the rice is completely cooked.
-
Remove the bay leaf before serving.
Recipe Notes
There you go! Delicious brown rice that you will want to eat every day!